Pages

Showing posts with label Crafts. Show all posts

Thursday, March 22, 2012

Finally picked...

So, I finally decided on some fabric for my couch pillows. I remembered that you can buy fabric on Etsy and that opened up a whole new world of options. My husband has been poking fun at me because I just couldn't decide. He kept reminding me that it is an easy thing to change if I order or buy something and I don't quite like it.

Anyway, here's what I have decided on. I'm hoping they will look great together. I am nervous about buying fabric online without seeing and touching it in person.
The Esty store I originally found this on only has one yard left. I found it on a couple other Etsy stores, so hopefully one of them will have enough. I am making sure to buy extra in case I mess up or want to use the leftover fabric for anything else.

I decided to just do a green fabric for the ruffles instead of doing both green and yellow. It was hard enough finding two fabrics I liked enough to commit to rather than 3!

Friday, March 16, 2012

Next project--pillows

My next project is to recover some pillows that live on our couch. We were given two throw pillows by a friend months ago. They were going to get rid of them. So this project has been on my mind for a while and I'm finally going to attempt to find fabric and such.

Here's the design I want to go with (the square ruffled pillow in the front):

But I want to do the back in a brown, like this (this fabric is soft, flannel per my husband's request):

And I want one layer of ruffles to be like this color:


And the other layer of ruffles to be in this color:


I just can't decide which fabric patterns I want. I found all of these options on Amazon. I had a gift card for Amazon, but then I ended up using it to buy some new Rainbow flip flops. Obviously, I wouldn't do both a yellow and green stripe since that would be too much. I'm just being indecisive.

Tuesday, March 13, 2012

Some darn cute curtains!

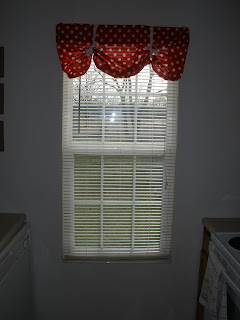
Since joining Pinterest I've been pinning away. I pinned some really cute curtains that I wanted to try in my kitchen. I've been looking and looking for curtains in there, but I haven't been able to find anything worth buying. I had a bunch of left over red and white polka dot fabric when I made a curtain to go over the windows in the back door, so I knew I had to use that.

Here's the image I pinned:
Source--really easy! They could probably be done basically no sew if you aren't handy with a sewing machine

And here's my final product:

Monday, October 10, 2011

Picture Frame Dress Up

As mentioned in a previous post, I am going to share with you how I dressed up a photo frame for my "wedding shelf" with the ribbon and pins from my wedding bouquet. It's so easy and could be done with any frame.
My Wedding Shelf...includes the bottle of wine we were given at our Rehearsal dinner, the two glasses we toasted with, my garter, the cake serving set (which desperately needs some polishing), picture frame, cake centerpiece, bottom of maple syrup that we used as favors and my husband's dried boutonniere.
Things you'll need:
Picture frame (I'm using one that holds an 8x10 photo...the front is just flat and white)
Ribbon
Decorative pins or other embellishments (buttons would be cute, too)
Wire cutter, if using pins
Glue gun and hot glue

First you'll tie the ribbon around the frame like I have done. Tie a bow on the corner. Then, if using decorative pins, you'll need a wire cutter to cut the top off the pin. My pins had a pearl-like top and looked so great against the brown satin ribbon. 
Once you have all the pins cut, eye ball or lay out how you want the pearls to lay on the ribbon. I love polka dots, so mine are in a polka dot pattern.
With a tiny dot of hot glue, glue the pearl tops onto the ribbon in your desired pattern. Hold it down until it dries.

* This post was shared on the following Link Parties:

Friday, September 23, 2011

Halloween Wreath--Tutorial

I've been seeing some super cute Halloween wreath tutorials around blog land. I just have a fall door thing and wanted to make something for Halloween. I got a fun idea and wanted to share it with all of. Since we have two black kitties and since black cats are one of those typical Halloween icons, I thought it would be fun to incorporate that onto a wreath.

Items you will need:
- wreath form (I used a green foam one from Michael's...I think it was 12 or 14 inches)
- one white foam sheet, purchased at Michael's
- one black glittery foam sheet, purchased at Michael's
- orange ribbon (I used one full roll and some from a 2nd roll of a 1 inch sized ribbon). Instead of ribbon, you could use yarn. Since I had done a yarn wrapped wreath a few months ago, my husband thought I should use ribbon for a different texture. I love his input!
- an extra piece of ribbon to hang your wreath from (I had a piece of black ribbon, so I used that. You could use some of your orange)
- hot glue gun and glue
- something to make whiskers (pipe cleaners, wire). I used paper clips. 

Wrap your wreath form with the ribbon. I overlapped the pieces a bit to make sure none of the wreath form showed through. I pinned the beginning to start and then used the piece of tape that was at the end of one roll to secure the end of that roll and the beginning of the next roll onto the wreath. Then I pinned the end. You could also glue the ribbon in place. At the time I wrapped my ribbon, I didn't have my glue gun warmed up.

Find an image of a cat that you want to use. I found this one online and sized it accordingly in Publisher. Print out the image of the cat to trace onto the glittery foam sheet. I cut out two cats since I have two black cats. If you are doing two cats, make sure to flip the image over to trace for the 2nd cat. Otherwise, you'll have two cats facing the same direction. Trace the cat image on the foam sheet and cut out. The glittery foam sheet wasn't as thick as the foam I used for the lettering, so I stabilized the cats with Popsicle sticks on the back. I didn't want them to get droopy.

Print out the word BEWARE (or another word of your choosing). Make sure it's a hefty font so it's easy to cut out of the foam. I used the font "Showcard Gothic." Cut the letters off the sheet so you can trace them. Trace the letters onto the white foam sheet. Cut out the letters with an exacto knife. I ended up having to trim the letters a bit because they were too fat.

Hot glue the letters and cats to the ribbon covered wreath.

Hot glue the ribbon loop on the back of the wreath so you have something to hang the wreath from.

If you want to include whiskers, you could use pipe cleaners or wire. I forgot to pick up some pipe cleaners, so I just used two paper clips. I unfolded the paper clips and straightened them out as much as possible. Then, with some wire cutters, I cut the two paper clips into 3 pieces each and hot glued the pieces onto the back of the cats face. They worked out great! I forgot to include the whiskers when I took pictures of the wreath, so that's why you can't see them. 

I LOVE the way this came out and I can't wait until October 1st to hang it on my door.


UndertheTableandDreaming


* This post was shared on the following Link Parties:

Thursday, September 22, 2011

Fall Banner/Bunting Tutorial

As promised, here is my tutorial for the Fall Banner/Bunting project. This project couldn't be any easier and could be used for any holiday or occasion.

Things you'll need:
- 4 sheets of scrapbook paper--12x12 sized
- Ribbon or twine or something to hang the triangles on
- mini clothespins
- buttons or other embellishments (stickers, etc)


I used my Silhouette machine to cut out a triangle to trace. You could eyeball it or trace a triangle that you happen to have on hand. I cut out 4 triangles from each sheet of paper. I only ended up using 3 of each color, but you could use more if your banner was longer.


Once you have the triangles cut out, you can embellish them. I used buttons from my expanding collection of buttons. I kept it simple. I thought about spelling Fall or Autumn with buttons, but after I laid it out, I wasn't feeling it. I did embellish one of the center triangles with a "T" in buttons for our last name. And I embellished the triangle next to it with a heart made out of my buttons. The heart came out kind of squished looking, but I'll call it folky. You could embellish with stickers or layer scrapbook paper triangles. Use your imagination.


I attached it to some white string I had lying around the house with some mini clothespins from my postcard display project. You could glue the triangles onto ribbon. I like being able to take the triangles off and change them around.

* This post was shared on the following Link Parties:

Tuesday, September 20, 2011

Fall Decorations and a Tutorial!

I absolutely LOVE fall! I love decorating for it, but I don't have a ton of fall decorations. I wanted to share with you some of the things I did and a tutorial for a fall leaves banner.

Pumpkins added to my everyday display on the bookshelf in the living room. I made that lantern back in the 7th grade. I'm very proud of it.
This is sitting on my coffee table. I love the two fabric pumpkins that I bought at Hobby Lobby last year. I added a mini pumpkin for the effect of three.
I made this banner/bunting (whatever this is called) using scrapbook paper. I originally had it hanging off the bar in the kitchen. Then I moved it to the stairs, but the kitties kept knocking it down, so I hung it from the wall in the living room. This is a really easy project to make for any season or party. I'll share a tutorial later this week.
The kitchen bar counter with metal pumpkins from our wedding. Usually I have pillar candles inside of them, but I don't have any at the moment, so I stuck a mini pumpkin in each. The center tray has my button collection. And the pumpkins each have two glass leaf-shaped tea light holders that were also at my wedding reception. It's really beautiful in the evening with candles lit in each. I have some faux leaves that I like to scatter on the counter with everything, but I know the kitties would absolutely love to play with those.
I love my cornucopia (also purchased at Hobby Lobby last year). I filled it with mini pumpkins. I love how the one in the front has a curly cue stem on it. I just need a yummy pie in the cake display and then this would be perfect!
This is my kitchen table display. I feel like it needs something else...maybe a table runner. A project for another day. The pumpkin was given to me by my little, Morganne, back in college. I have the faux leaves that were scattered down the aisle at my wedding inside for some color. It's fun to put candy inside for Halloween.
Here's my fall leaves banner. Super easy to make!
Tutorial for the 
Fall Leaves Banner
Things you'll need:
- scrapbook paper in fall colors. I used a bunch of paper in browns, oranges, reds. I used some patterned paper and some solid colored to give it an interesting look. I used a lot more paper than I was expecting. But it totally depends on how long or short your banner will be. 
- string/twine/ribbon. I looked for brown twine at Michael's, but for the life of me couldn't find any. So I just used some white string that I already had.
- hot glue gun and glue sticks

When I set out to do this project I had an image in my mind and wasn't sure how it would work out. My original idea came out looking pretty dumb, so I had to rework it.

Here's how to recreate my final project:
- cut out a bunch of leaves from your various pieces of scrapbook paper. I started off having my Silhouette do the cutting for me, but then the blade went dull or something, so I ended up cutting a lot of them out my hand. Very time consuming, but what else was I going to do. I used three different leaf shapes, but you could do more of a variety than that if you wanted to.

- Cut a piece of string/ribbon/twine to your desired length. I originally wanted to hang it from my staircase, so I measured that length with a little extra just in case.

- You can curl the leaves around a thick pen or wooden spoon to give them some dimension, if you want. I only thought of this because of my Silhouette. When I took them off the feeder sheet, they came off curled up and I liked the way it looked. It resembled real fallen leaves better. 

- Start gluing your leaves together in a line. You can see in the picture that mine is not a perfect line. Try to make it organic/natural looking---like they just happened to fall into place. Every so often, flip it over and glue the ribbon/string/twine to the back. Keep gluing until you've covered the whole length of your string.

- Hang and enjoy! Mine has hung a little funny, so I have to tuck it under the bar a little so it will hang upright better. I'm sure if I messed with it some I could fix that, but I haven't gotten there yet.

(In my picture, you can see some hole punches in some of the leaves...that's from my original idea where I hung them on the ribbon. When I did that, you couldn't see all the leaves and it looked really bad. I didn't feel like cutting out new leaves so I just made due with the hole punches).

* This post was shared on the following Link Parties:

Thursday, September 15, 2011

Delayed project...

Yesterday, I got all my fall decorations out. I love decorating for fall because the colors are so beautiful. However, I don't have very many fall decorations. I had an idea for a fun project which utilized things I already had (thus cost free!). However, mid project, my Silhouette blade decides it does not want to cut anymore. Ugh! I was hoping to finish the project and get it on here to share with everyone (assuming that it works out).

Here's what my project is: I have been using the Silhouette to cut out leaves. I think I'll need a whole bunch, but I'm not exactly sure how many. I'm planning on attaching them to some string or ribbon to make a fall leaf garland, of sorts, to hang on my stair rail. My living room needs some more fall decorations and that would be perfect. I'm not exactly sure how it will end up. I just ordered a new blade, so I probably won't get this project finished for another week (or longer since next week I'm having my wisdom teeth taken out and I don't know how long I'll be down and out). Of course, once it's finished, I'll share it on here!

Tuesday, August 30, 2011

SC Map--stolen project

My friend from college and author of Grits and Giggles did a SC map project back in June. She cut out the counties of South Carolina from fabric and sewed them all together. The finished project looks so cute! I decided to do my own version, but slightly different. I am not ambitious enough to use fabric and sew all those pieces together, so I used scrapbook paper. Here's a tutorial!

First, you will need to find a map of your state with the various counties. This is a good one for SC; it's not the one I used, but the one I used is a PDF so I can't put it up here. I wish I had used this one...It's got more straight edges.


Print out your map on regular computer paper. Then cut out each county.

Trace the counties on scrapbook paper. I used various scraps I had in my stash. Cut out the counties. Make sure to label the back so you can easily remember which is which.

Print out the map again on cardstock to lay your pieces out on. I printed mine with the "Fast" setting because you won't see the printout once all your counties are glued down. My first attempt at this project, I did not do this step and it came out completely messed up. I had to recut all my counties and everything. Very annoying.

Glue all your pieces on your map. I used my Xyron.

Then I cut the white paper around the map to give a little white border. Then you can glue it on a bigger piece of scrapbook paper and frame it.
Finished project!

* This post was shared on the following Link Parties:

Monday, August 8, 2011

Gilmore Girls inspired wall decor

I've been feeling very uninspired lately. Part of it is the fact that I've been feeling down about the lack of prospects in my job search. And part of it was that I've been too busy with my parents coming to town and now my brother-in-law will be visiting.

However, last week I did come up with a fun art project for my half bath. As you all know, my favorite TV show is Gilmore Girls. I've been watching it for the billionth time and I'm now on the last season. In the first episode there is a quote that I absolutely love. I though it would be cute painted on something and hung somewhere in my house. I was at Michael's and they had all their canvas on sale so I got a 12x12 sized one. I painted it to match the rug in the guest room. I was very impressed with my near accuracy at matching some of the colors that are in the rug. Then I printed out the quote and transferred to the best of my ability onto the painted canvas. I rubbed pencil on the back and wrote over the print-out so the words would transfer. It worked pretty well after I got the pencil rubbing dark enough. Then I wrote over it with a Sharpie. It turned out really cute.
The quote reads, "It's like my life isn't even real to me unless you're there and you're in it and I'm sharing it with you..."
* This post was shared on the following Link Parties:


Monday, July 25, 2011

Wall decor projects

Here are a couple of wall decor projects I have completed lately.

My display for in the frames
First one is a postcard display. My brother-in-law travels a lot and has been sending us postcards. My husband wanted to display them and it was my job was to figure out how. We already have a map hanging in our guest bedroom (we put pins in the places we have been). So I thought a postcard display would fit right in around the map. I have a couple of 5x7 frames that I wasn't using. So, I created a little thing that said "Postcards from around the World" and put one in each frame. Then I glued a piece of ribbon to the back in the middle. I bought some mini clothespins and pinned the postcards on the fabric. I hung one of each side of the map. It turned out really cute. I had to trim the ribbon shorter than what I originally had because the kitties played with it. 

If anyone wants to send us a postcard for our display, we would love it! 

If you want to create your own postcard display and want the file I used for in the frames, just comment about it. I can change the colors to whatever you want.
The second project has been a long time coming. My wedding dress had a really pretty red sash/bow on the back. I've never going to wear my wedding dress ever again (I still haven't even gotten it professionally cleaned and it has been almost 3 years). I've been thinking about displaying the sash in our bedroom. My first thought was get it framed in a shadowbox frame. But since I'm not a millionaire, that was out of the question. My next thought was to get some blank canvas (you know the kind that is already stretched and has a wooden frame) and somehow attach it to that and hang it on the wall.

Then, at Michael's, I saw this cute hook with a T on it. I bought it because it was only $2. I didn't know quite where I was going to put it. I asked my husband for his opinion but he was no help. Boys! Then it dawned on me! I could hang the sash on it. I painted the T a buttery-gold color to match our room and hung the sash on it. I'm really loving how it turned out. Now I just have to cross my fingers that the kitties do not play with it.

This post was shared on the following Link Parties:


homework

Wednesday, July 20, 2011

Rag Rose Tutorial

The other day one of the blogs I follow had a post about a rag rug. It got me thinking about all the scraps of fabric I have in my fabric bin. I decided to make what I'm calling Rag Roses. I'm sure someone else has already thought of this, but I've never seen it before (that I know of).

Step 1: Cut out three strips of fabric. Mine were about 1 inch wide and about 10 inches long. If you make them longer then your rose will be bigger and if you make them shorter than your rose will be smaller.
 Step 2: Hold the tops together with a clothespin. You can just hold it with your fingers, but it makes the next step a little more difficult.
Step 3: Braid your strips together. Make sure the good side of the fabric is facing out each time.


Step 4: Hot glue the ends. I hot glued the 3 pieces at the end together and then folded it over and glued it on itself. I hope you know what I mean by that. It's kind of hard to explain. Just glue it so the ends are kind of tucked under to prevent unraveling.

Step 5: Start rolling it up. Hot glue as you go along. You could sew it together, but I thought hot glue would work just fine.
Once you've completed all your rolling and gluing you should have one completed Rag Rose! You can put it on a pin or make a hair pin with it. Or use it to embellish other craft projects.

This post was shared on the following Link Parties:
Reasons to Skip the Housework
Ladybug Blessings 
Cherished Bliss 

Tuesday, July 19, 2011

Preview

Here's a little preview of a project I'm working on...


Tuesday, July 12, 2011

No Sew Chair Cushions

I've been meaning to make some chair cushions for our kitchen chairs for about 2 years now. My husband likes to have a cushion to sit on. He has been using a regular bed pillow for the past few years, which doesn't exactly fit into my design scheme. I've had all the materials for these cushions, thanks to my mom, but thought I had to make the covers with the sewing machine. To be honest, that intimidated me because I wanted that tailored look, but didn't feel like dealing with the hassle. The idea for no sew cushions dawned on me last week. I wasn't sure if it would work out, but so far they are working out great. Here's how you can make some too!

Materials
Foam. I got mine at the fabric store and cut them to fit our kitchen stools. Make sure you get foam that is thick enough for your comfort.
Fabric. I didn't really measure how much I used, but you'll need enough to cover all your foam cushions, so about twice the size of your cushion. I used regular cotton fabric. If you want easier clean-up, then it would probably be best to get some tablecloth material that can be wiped clean easily.
Hot glue and hot glue gun. Mine is high temp (I don't know if it matters)

Cut your fabric to cover the foam cushion. I didn't cover the whole bottom because no one would see it anyway.
Hot glue the fabric to the foam on two sides. I just hot glued in the middle, but I am wishing I would have hot glued more than just the middle.
Then act like you are wrapping a present and hot glue the other two sides to the foam

 Flip it over and you have one completed no sew cushion. Repeat the steps for the remaining cushions.

Thursday, July 7, 2011

Entered the Etsy World

I have decided to enter the world of Etsy as a seller. It's the cool thing to do. :) I really enjoyed making those ribbon flowers for my yarn wreath and I had some pin backs lying around from a previous project. I thought they would make great pins. So I made a few from the ribbon I have on hand and listed them on Etsy.

Check them out here!

Tuesday, July 5, 2011

Scrapbooking 101

My obsession with scrapbooking started back in middle school. In 8th grade, my mom got into the Creative Memories/scrapbooking thing and I got hooked. My style has changed a lot since then. I look back at my first couple of scrapbooks and think oh my goodness...these are awful! But at the time I was very proud of them. I scrapbook just about everything I have pictures for. It's like a journal or record of my life. I include calendars in my books to help me organize my books in a logical way and to be able to see what I did throughout the month, especially since I don't have pictures of absolutely everything I did.

I thought I would give a little scrapbooking basics for any of you that are thinking about starting.

Materials you'll need:
- Scrapbook. I love to use the 12x12 post hinge scrapbooks. There is plenty of room for pictures and I like the post hinge design for flexibility. If I forget to add in a page, I just slip pages out of the plastic sheets and move them around as needed. There are so many options for scrapbooks that you can't really go wrong. Just make sure it's acid and lignin free.

- Pictures. I use the website Winkflash for all my printing. They have great prices on prints. If you're their fan on Facebook, you'll see they post a different deal every day. Last time I ordered prints, they had a free shipping offer that day.

- Paper. I am obsessed with scrapbook paper. It's very dangerous for my wallet to walk down the aisle with scrapbook paper at any craft store.

- Adhesive. Make sure you get scrapbooking adhesive (acid and lignin free). I use Scrapbook Adhesives by 3L, the E-Z Runner white permanent kind. I've been using this kind for years now and I love it. It comes out in little strips so you can use as much or as little as you need. And if you need to move something after you've placed it on the page, it comes off pretty easily.

- Scissors or paper cutter. This comes in handy when you need to trim some paper or pictures.

- Decorative accessories. I use paper, stickers, pens, pictures and things like ticket stubs only. I'm not a fan of using buttons, ribbons, brads, etc. Too much to deal with. But again, that's just my personal preference. If you want quick and easy, do what I do.

Once you have all those pieces, create away. Don't get intimidated by scrapbooking magazines. They always show such elaborate pages. Just stick the pictures on the pages however you like. It's not about being in a magazine. It's about putting your memories down before they are forgotten.

Monday, July 4, 2011

Stolen Project--Yarn Wreath

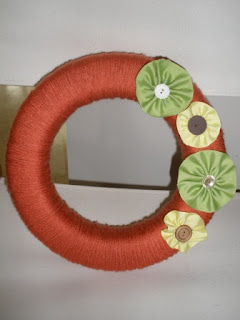
A week or two ago, my friend posted a Yarn Wreath for the 4th of July on her blog, Grits and Giggles. I loved the idea and I wanted a wreath that I could use right before and after 4th of July. I love to decorate for the holidays, but I was missing a summer wreath. So, I took her idea and made my own. It's so simple. Mine is a little different from her's because she used fabric to make ruffle flowers and I used ribbon. I saw a tutorial on how to make ribbon flowers on another blog I follow.

Materials needed:
- foam wreath
- bundle of yarn
- ribbon (I used 2 different colors)
- buttons

Cover the foam wreath with the yarn. I used the whole bundle which meant I went around the wreath with it several times. This part is a little tedious, but if you need a mind-numbing activity, this is it! At the end, just tie the end in the back.

To make the ribbon flowers, check out Kojo Designs. They are really easy to make. I used two different colors and I made two of each color. On her tutorial, she said to make them 8 inches long. I did that for the yellow ones. For the green, I made one 12 inches long and one 10 inches long. I wanted to experiment with the different lengths. But I don't think it really matters all that much.

Once you're done with the flowers, arrange them on the wreath. Hot glue a button to be the center of the flower and then hot glue the flowers to the wreath.

Finished wreath
Cute ribbon flowers