Pages

Showing posts with label Tutorial. Show all posts

Friday, January 10, 2014

Race Bib Display

Now that Charles is an avid runner, he has amassed quite a few race bibs. I knew he needed a way to display them. I first visited Etsy because I was thinking about just buying one. I found several that I kind of liked, but I could not find the perfect one. I often get an idea in my head and cannot find exactly what I am imagining. Then I decided that I could just make one! It was pretty easy.

What you will need:
- piece of wood. Mine was purchased from Hobby Lobby and measures 12x24. I'm not sure how thick it is, but you'll probably want one thicker.
- chalk paint
- wooden letters
- paint for the wooden letters
- wood glue
- hooks
- hanging accessory

Paint your board with several layers of chalkboard paint.

Paint your wooden letters. I chose the word RUN. If you browse the bib displays on Etsy you can get some other word ideas. Instead of wood letters you could use vinyl or hand paint your word(s).

Glue the letters to your dried chalkboard.

Figure out the spacing for the bibs. Most of Charles' bibs matched. The ones that had wider or narrower holes were re-punched so I would not have to use multiple pairs of hooks.

Screw the hooks into the board. My board was a little thin so we could not screw them all the way in. It worked out fine, but if you are particular you will want to purchase a thicker piece of wood.

Attach the hanging accessory to the back. I picked the kind that looks like a saw. I have no idea the official terminology for those.

I used chalkboard paint so Charles can record his fastest times for each kind of race. We have not bought any chalk yet, so mine is simulated in the picture above.

He received the ribbon display as a gift. And the two shadow boxes display items from his first two marathons.


Wednesday, January 8, 2014

DIY Button Necklace

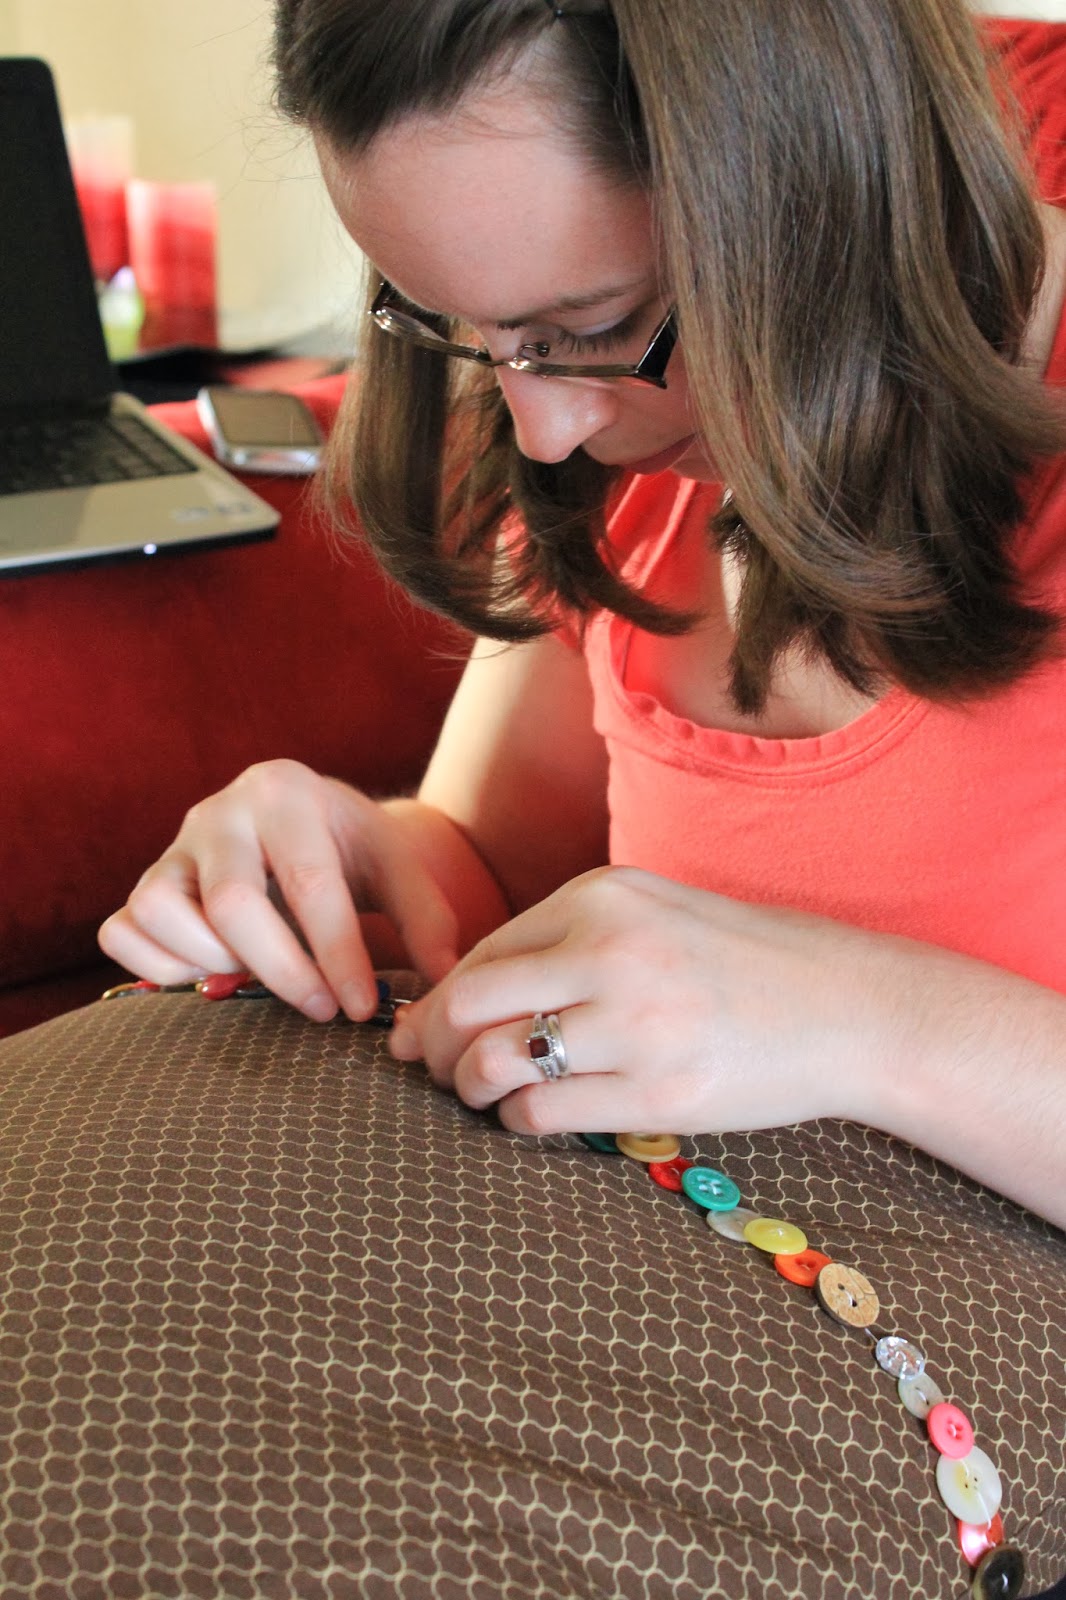
If you did not know already, I love buttons! I cannot quite explain it, but I love looking at all the different kinds and colors. I have some in jars sitting on my coffee table right now. I even received a bag of buttons for Christmas and was thrilled!

I saw this necklace on Etsy and fell in love. I was very close to buying it several times. Then I turned to Pinterest for a tutorial and found a great one. Why buy when you can DIY?

The Littlest Big Spoon Etsy store
Here is what you'll need to make your very own button necklace:
- Buttons (of course)
- Necklace closure. I went with the toggle variety.
- String, wire or yarn. I used quilting thread. (If I make another one I might go with a thicker string.)
- This tutorial


Monday, March 4, 2013

Project #1

My Long Morrow projects have started. I have been wanting a new "wreath" for my front door. I just took down the Valentine's Day one, but the next one I have is for spring/early summer. With the weather here still cold and snowy, it didn't feel right to have a spring item on my door.

I headed to Michael's and decided to buy a letter T to decorate with buttons! I adore buttons! I have no explanation, but I just love to collect them. I have a fairly sizable collection and love to add to it when I can.


I hot glued away and came up with this. I love it!


Monday, October 10, 2011

Picture Frame Dress Up

As mentioned in a previous post, I am going to share with you how I dressed up a photo frame for my "wedding shelf" with the ribbon and pins from my wedding bouquet. It's so easy and could be done with any frame.
My Wedding Shelf...includes the bottle of wine we were given at our Rehearsal dinner, the two glasses we toasted with, my garter, the cake serving set (which desperately needs some polishing), picture frame, cake centerpiece, bottom of maple syrup that we used as favors and my husband's dried boutonniere.
Things you'll need:
Picture frame (I'm using one that holds an 8x10 photo...the front is just flat and white)
Ribbon
Decorative pins or other embellishments (buttons would be cute, too)
Wire cutter, if using pins
Glue gun and hot glue

First you'll tie the ribbon around the frame like I have done. Tie a bow on the corner. Then, if using decorative pins, you'll need a wire cutter to cut the top off the pin. My pins had a pearl-like top and looked so great against the brown satin ribbon. 
Once you have all the pins cut, eye ball or lay out how you want the pearls to lay on the ribbon. I love polka dots, so mine are in a polka dot pattern.
With a tiny dot of hot glue, glue the pearl tops onto the ribbon in your desired pattern. Hold it down until it dries.

* This post was shared on the following Link Parties:

Friday, September 23, 2011

Halloween Wreath--Tutorial

I've been seeing some super cute Halloween wreath tutorials around blog land. I just have a fall door thing and wanted to make something for Halloween. I got a fun idea and wanted to share it with all of. Since we have two black kitties and since black cats are one of those typical Halloween icons, I thought it would be fun to incorporate that onto a wreath.

Items you will need:
- wreath form (I used a green foam one from Michael's...I think it was 12 or 14 inches)
- one white foam sheet, purchased at Michael's
- one black glittery foam sheet, purchased at Michael's
- orange ribbon (I used one full roll and some from a 2nd roll of a 1 inch sized ribbon). Instead of ribbon, you could use yarn. Since I had done a yarn wrapped wreath a few months ago, my husband thought I should use ribbon for a different texture. I love his input!
- an extra piece of ribbon to hang your wreath from (I had a piece of black ribbon, so I used that. You could use some of your orange)
- hot glue gun and glue
- something to make whiskers (pipe cleaners, wire). I used paper clips. 

Wrap your wreath form with the ribbon. I overlapped the pieces a bit to make sure none of the wreath form showed through. I pinned the beginning to start and then used the piece of tape that was at the end of one roll to secure the end of that roll and the beginning of the next roll onto the wreath. Then I pinned the end. You could also glue the ribbon in place. At the time I wrapped my ribbon, I didn't have my glue gun warmed up.

Find an image of a cat that you want to use. I found this one online and sized it accordingly in Publisher. Print out the image of the cat to trace onto the glittery foam sheet. I cut out two cats since I have two black cats. If you are doing two cats, make sure to flip the image over to trace for the 2nd cat. Otherwise, you'll have two cats facing the same direction. Trace the cat image on the foam sheet and cut out. The glittery foam sheet wasn't as thick as the foam I used for the lettering, so I stabilized the cats with Popsicle sticks on the back. I didn't want them to get droopy.

Print out the word BEWARE (or another word of your choosing). Make sure it's a hefty font so it's easy to cut out of the foam. I used the font "Showcard Gothic." Cut the letters off the sheet so you can trace them. Trace the letters onto the white foam sheet. Cut out the letters with an exacto knife. I ended up having to trim the letters a bit because they were too fat.

Hot glue the letters and cats to the ribbon covered wreath.

Hot glue the ribbon loop on the back of the wreath so you have something to hang the wreath from.

If you want to include whiskers, you could use pipe cleaners or wire. I forgot to pick up some pipe cleaners, so I just used two paper clips. I unfolded the paper clips and straightened them out as much as possible. Then, with some wire cutters, I cut the two paper clips into 3 pieces each and hot glued the pieces onto the back of the cats face. They worked out great! I forgot to include the whiskers when I took pictures of the wreath, so that's why you can't see them. 

I LOVE the way this came out and I can't wait until October 1st to hang it on my door.


UndertheTableandDreaming


* This post was shared on the following Link Parties:

Tuesday, September 20, 2011

Fall Decorations and a Tutorial!

I absolutely LOVE fall! I love decorating for it, but I don't have a ton of fall decorations. I wanted to share with you some of the things I did and a tutorial for a fall leaves banner.

Pumpkins added to my everyday display on the bookshelf in the living room. I made that lantern back in the 7th grade. I'm very proud of it.
This is sitting on my coffee table. I love the two fabric pumpkins that I bought at Hobby Lobby last year. I added a mini pumpkin for the effect of three.
I made this banner/bunting (whatever this is called) using scrapbook paper. I originally had it hanging off the bar in the kitchen. Then I moved it to the stairs, but the kitties kept knocking it down, so I hung it from the wall in the living room. This is a really easy project to make for any season or party. I'll share a tutorial later this week.
The kitchen bar counter with metal pumpkins from our wedding. Usually I have pillar candles inside of them, but I don't have any at the moment, so I stuck a mini pumpkin in each. The center tray has my button collection. And the pumpkins each have two glass leaf-shaped tea light holders that were also at my wedding reception. It's really beautiful in the evening with candles lit in each. I have some faux leaves that I like to scatter on the counter with everything, but I know the kitties would absolutely love to play with those.
I love my cornucopia (also purchased at Hobby Lobby last year). I filled it with mini pumpkins. I love how the one in the front has a curly cue stem on it. I just need a yummy pie in the cake display and then this would be perfect!
This is my kitchen table display. I feel like it needs something else...maybe a table runner. A project for another day. The pumpkin was given to me by my little, Morganne, back in college. I have the faux leaves that were scattered down the aisle at my wedding inside for some color. It's fun to put candy inside for Halloween.
Here's my fall leaves banner. Super easy to make!
Tutorial for the 
Fall Leaves Banner
Things you'll need:
- scrapbook paper in fall colors. I used a bunch of paper in browns, oranges, reds. I used some patterned paper and some solid colored to give it an interesting look. I used a lot more paper than I was expecting. But it totally depends on how long or short your banner will be. 
- string/twine/ribbon. I looked for brown twine at Michael's, but for the life of me couldn't find any. So I just used some white string that I already had.
- hot glue gun and glue sticks

When I set out to do this project I had an image in my mind and wasn't sure how it would work out. My original idea came out looking pretty dumb, so I had to rework it.

Here's how to recreate my final project:
- cut out a bunch of leaves from your various pieces of scrapbook paper. I started off having my Silhouette do the cutting for me, but then the blade went dull or something, so I ended up cutting a lot of them out my hand. Very time consuming, but what else was I going to do. I used three different leaf shapes, but you could do more of a variety than that if you wanted to.

- Cut a piece of string/ribbon/twine to your desired length. I originally wanted to hang it from my staircase, so I measured that length with a little extra just in case.

- You can curl the leaves around a thick pen or wooden spoon to give them some dimension, if you want. I only thought of this because of my Silhouette. When I took them off the feeder sheet, they came off curled up and I liked the way it looked. It resembled real fallen leaves better. 

- Start gluing your leaves together in a line. You can see in the picture that mine is not a perfect line. Try to make it organic/natural looking---like they just happened to fall into place. Every so often, flip it over and glue the ribbon/string/twine to the back. Keep gluing until you've covered the whole length of your string.

- Hang and enjoy! Mine has hung a little funny, so I have to tuck it under the bar a little so it will hang upright better. I'm sure if I messed with it some I could fix that, but I haven't gotten there yet.

(In my picture, you can see some hole punches in some of the leaves...that's from my original idea where I hung them on the ribbon. When I did that, you couldn't see all the leaves and it looked really bad. I didn't feel like cutting out new leaves so I just made due with the hole punches).

* This post was shared on the following Link Parties:

Monday, June 20, 2011

Budgeting done easy

Budgeting is kind of a necessary evil. I started budgeting in high school as a project with one of my friends. Our goal was to keep each other accountable for our spending which didn't really happen, but I've been using the same budgeting format since. It works for me and is really easy, so I thought I would share.

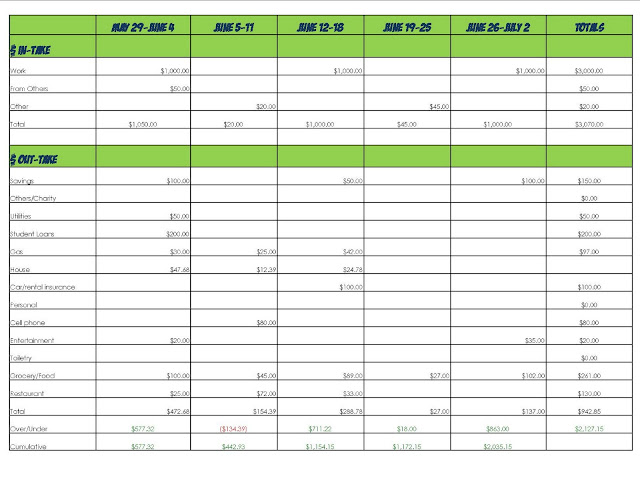
I keep up with my budget in an Excel document. It adds the numbers for me and everything is neat and in it's own little box. Each month, I create a new file. This allows me to save the previous months and look back at them to compare how my spending has changed or stayed the same. In the picture you'll see how I set it up:
Example of a monthly budget
I break it into weeks (Sunday to Saturday). The top part is for money we're bringing in (work, monetary gifts, etc). The bottom is for what we spend. I have broken the spending into various categories like savings, entertainment, gas, groceries. etc. But feel free to divide it in any way you want. The last two lines allow me to see at a glance how I'm doing. Over/Under means how much over or under I spent compared to how much we brought in. Cumulative shows how much over or under I am across the whole month. These two lines are not necessary, but I would highly encourage to at least include the Over/Under row. I have it set up so that if I overspent, the number in the over/under box is red and if I underspent then it's green.

If you are interested in starting your own budget and need some pointers, just comment and I will gladly help you out!

* This post was shared on the following Link Parties: